I am pleased to announce a new release 0.7.0 of Entangle is available for download from the usual location:
http://entangle-photo.org/download/
The main features introduced in this release are a brand new logo, a plugin for automated capture of image sequences and the start of a help manual. The full set of changes is
- Require GLib >= 2.36
- Import new logo design
- Switch to using zanata.org for translations
- Set default window icon
- Introduce an initial help manual via yelp
- Use shared library for core engine to ensure all symbols are exported to plugins
- Add framework for scripting capture operations
- Workaround camera busy problems with Nikon cameras
- Add a plugin for repeated capture sequences
- Replace progress bar with spinner icon
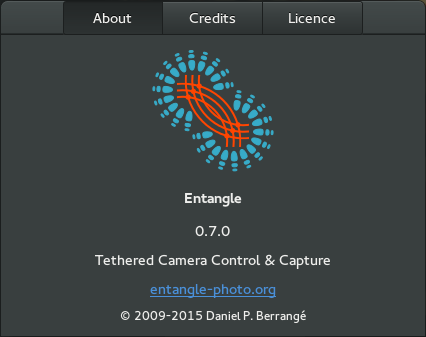
The Entangle project has a bit of a quantum physics theme in its application name and release code names. So primary inspiration for the new logo was the interference patterns from (electromagnetic) waves. As well as being an alternate representation of an interference pattern, the connecting filaments can also be considered to represent the (USB) cable connecting camera & computer. The screenshot of the about dialog shows the new logo used in the application:
I am pleased to announce a new release 0.6.1 of Entangle is available for download from the usual location:
http://entangle-photo.org/download/
This release has primarily involved bug fixing, but one major user visible change is a rewrite of the camera control panel. Instead of showing all possible camera controls (which can imply 100’s of widgets), only 7 commonly used controls are displayed initially. Other controls can be optionally enabled at the discretion of the user and customization is remembered per camera model.
- Require GTK >= 3.4
- Fix check for GIO package in configure
- Add missing icons to Makefile
- Follow freedesktop thumbnail standard storage location
- Refactor capture code to facilitate plugin script automation
- Fix bug causing plugin to be displayed more than once
- Make histogram height larger
- Strip trailing ‘2’ from widget labels to be more friendly
- Completely rewrite control panel display to show a small, user configurable subset from all the camera controls.
- Remember custom list of camera controls per camera model
- Hide compiler warnings from new glib atomic opertaions
- Update to newer gnulib compiler warnings code
- Remove broken double buffering code that’s no required when using GTK3
- Remove use of deprecated GtkMisc APis
- Allow camera picker list to show multiple lines
- Remove crufty broken code from session browser that was breaking with new GTK versions
- Disable libraw auto brightness since it totally overexposes many images, generally making things look worse
- Fix memory leak handling camera events
- Add keywords to desktop & appdata files
In the time off over Christmas and the New Year I decided to investigate & learn about the creation of GNOME Shell extensions. As an amateur astronomer, I have an interest in knowing what the “seeing conditions” will be like in the forthcoming nights. There are a number of different websites which provide forecasts, as well as apps for Android and iPhone. I use the Android AstroPanel application quite frequently, but most of the day I’m sitting in front of my laptop and would rather have the data presented there, alongside the regular weather forecast, rather than on my phone. So after finding that extensions are quite simple to create, I decided to create an extension for displaying an astronomical weather forecast for GNOME Shell.
The design of my extension is a cross between the well known Weather extension and the 7Timer/AstroPanel forecast display. Rather than describe it, just look at this screenshot:
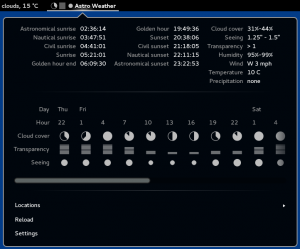
AstroWeather GNOME Shell Extension
The actual weather forecast is obtained from the 7Timer REST service using the Soup HTTP client APIs, which conveniently returns JSON data perfect for accessing from JavaScript. The times for sunrise/sunset are calculated locally, using code that I derived from the BSD licensed suncalc project. Finally the locations are pulled from the GNOME GWeather database.
The first release of AstroWeather is available for installation with GNOME 3.10 from the GNOME Shell Extensions website. I didn’t realize that you had to list every single darn GNOME shell version explicitly in the metadata.json file, so while it works fine with GNOME 3.12, the extensions website will seemingly refuse to let you install it :-( I’ll upload a new version which explicitly says it supports 3.12 soon. There’s also a slight bug with sunrise/sunset calculations which cause it to display “Invalid Date” if there is no sunset/sunset time available – in the UK we’re far enough north that you never get any astronomical sunset in June, and I forgot to handle that possibility since I wrote the code when it was nice and dark :-)
The, GPLv2+ licensed, source code is available as a GIT repository on gitorious.org
As well as fixing bugs, in the future I’d like to make it possible to specify arbitrary locations with long+lat since the GWeather location database is very limited in its choices. Using some kind of GeoIP service would make it possible to just “do the right thing” for your current location. I’d also like to have it display the phase of the moon, inform you which planets will be visible overnight and list any ISS overhead passes. Finally I want to integrate with astronomical forecast data sources beyond 7Timer, since their REST API has sadly been having extended periods of downtime. Contributions from any other interested people are of course welcome, either patches via email or merge requests via gitorious.
I am pleased to announce a new release 0.6.0 of Entangle is available for download from the usual location:
http://entangle-photo.org/download/
This release has a mixture of bug fixes and new features / changes and new widget styling
- Add a demonstration plugin for setting up a captive photo box display mode
- Switch to use Python3 for plugin engine instead of JavaScript
- Use GTK dark theme
- Require GNOME symbolic icon theme to be installed
- Switch to require lcms2 instead of lcms
- Move application icon into a standard directory mandated to work with the appdata tools
- Make manual focus work with Canon EOS cameras
- Disable flickering progress bar in preview mode with Canon EOS cameras
- Remove use of deprecated GTK methods/classes/constants
- Remove use of gexiv2 method which is not long exported
- Remove use of deprecated libpeas methods
- Add GTK-DOC transfer annotations / docs to all methods
- Avoid loosing camera capabilities on disconnect
- Fix off by one in histogram tables causing memory corruption
- Mark appdata / desktop files for translation
- Fix typos in README file
- Fix inverted tests when checking if range widget changed
- Avoid storm of expose events due to auto-drawer widget
- Avoid never ending circular update of controls causing errors in some camera modes
- Add workaround for crazy D5100 camera serial number
- Add customizable highlight/background for images
- Avoid reference leak of windows preventing proper cleanup
- Remove camera manual/about/driver help windows since it did not contain any info useful to users
- Filter list of cameras in connect dialog to only those which support capture/preview
- Don’t auto connect to cameras which don’t support capture or preview
- Ensure parent window is set on dialogs to prevent them falling behind main window
- Fix crash with latest GTK due to incorrect overriding of GtkApplication startup method
- Update to cope with changed GExiv API version
- Refreshed translations from transifex
Thanks to the great work of the Fedora translation team, Entangle has > 90% translation coverage for Dutch, Polish, Ukrainian, French and Japanese and > 80% coverage for Swedish, Czech, Hungarian, Italian, Spanish, Chinese and German. If you are in a position to help translate Entangle further, consider joining the Fedora translation team.
Libre Graphics Meeting, 2014
Last week I took some time off from my day job working on virtualization, to travel to Leipzig for this years LibreGraphicsMeeting. This was my first visit to LGM, coming about after Jehan Pagès suggested that I present a talk about Entangle in order to attract more developer & user interest. I had a 20 minute slot at the end of the first day where I went through the basic concepts / motivation behind the project, then did a short live demo, finishing up with a look at some of the problems facing / future needs of the project. Historically my talks have always involved death-by-bullet-point style libreoffice slides, but for LGM I decided it was time to up my game. So I turned to the GNOME Pinpoint application:
“a simple presentation tool that hopes to avoid audience death by bullet point and instead encourage presentations containing beautiful images and small amounts of concise text in slides”
I took this to heart, creating a set of slides which consisted entirely of beautiful images I’ve taken myself overlaid with just one or two words of text. I found it quite a liberating experience to give a presentation using such a slide deck, since it freed me from having to read the slides myself or worry that I’d forgotten to talk about a particular bullet point. Hopefully those in the audience found the talk a more fluid & engaging experience as a result. After the talk, and in the days following, I had interesting discussions about Entangle with a number of other attendees, so going to LGM definitely achieved the goal of attracting more interest.
At the end of the last day, we had the usual conference group photo, but Jakub Steiner then raised the bar by getting out his quad-copter with camera mounted to shoot a group video from the air.
Application plugins
Since the very start of the project, it has always been the intention for users to be able to extend the core interface with custom plugins. Thus far though, this has been all talk, with little real action. Entangle is written using GTK/GObject with a fairly well structured object hierarchy / codebase to make it easier to understand / extend and integrates with the libpeas library for plugin infrastructure. What has been missing is proper annotations on the internal APIs to enable GObject Introspection to be able to correctly call them from non-C languages. The past few weeks I’ve been working hard to address all the warnings displayed by g-ir-scanner with the goal that all internal APIs are fully annotated with calling conventions.
I had tentatively setup libpeas to use the ‘gjs’ loader to enable plugins to be written in JavaScript, inspired by the fact that GNOME Shell is extendable using JavaScript. At LGM, Martin Owens (IIRC) mentioned in passing to me that he thought Entangle would be better off using Python. Though we didn’t get into a deep discussion on this matter at the time, it got me thinking about whether JavaScript was the right choice. A few months back I did start hacking on a GNOME Shell extension for displaying an astronomy weather forecast in the top bar, which naturally enough was in JavaScript. One of the frustrating things I found with that effort was a general lack of documentation / examples about JavaScript usage in the context of non-browser apps, as well as the lack of a good archive of reusable library functions. While the GNOME platform APIs are, of course, all available for usage, there’s more to the world than GNOME. In particular I needed code for calculating sunset/sunrise times and lunar phases. With this experience in mind, and since there are no plugins yet written for Entangle, I’ve decided to switch it to use Python for its plugin system. This means that as well as having access to the GNOME platform APIs, plugin authors will be able to leverage the entire Python ecosystem which is truly enormous. Since Entangle requires GTK3, which is pretty modern, I decided I might as well ignore Python 2.x, so Entangle is going to require Python 3 only. This avoids a painful decision later about whether/when to switch from 2 to 3.
To actually prove that the plugin system is useful, I’ve also started work on a simple demonstration plugin. The goal of the plugin is to provide a way to turn the UI into a capture “selfie” photobox. This was inspired by the fact that a user has already used Entangle for such a system in the past. The plugin basically just hides the menu bar, toolbar and camera settings panels, adds a large “capture” button and then puts the app into fullscreen mode. Working on this helped me identify a few issues in the codebase which were making life harder than it needed to be – for example there was no easy way to get access to the GtkBuilder object associated with a window, so getting hold of individual widgets was kind of tedious. With the first cut of the plugin now written and working, it should serve as nice example code for users interested in figuring out how to write more plugins. At the top of the list for plugins I want to work on next is something to automate the shooting of an entire sequence of images. For example with astrophotography it is common to take sequences of many 100’s of images over several hours. You quickly become bored of pressing the shutter button every 30 seconds, so automation is very useful.
Windows porting
One of the memorable quotes from LGM was
“5% of the Windows market is larger than 95% of the Linux [desktop] market”
While I’m not personally interested in using Windows on the desktop, preferring GNOME 3 and open source software exclusively, I realize that not everyone shares this viewpoint. There are plenty of people who want to continue to use Windows for whatever reasons they have, but wish to be able to use cool open source applications like LibreOffice, GIMP, Digikam. The Nikon provided software for DSLR control is not cheap, so there’s clearly an opportunity for Entangle to be useful for Windows users. The key factor from my POV is minimising the overhead / costs of maintaining the port. I don’t want to have to use Windows on a day-to-day basis for this porting work, so getting it working using Mingw64 and hopefully WINE is a pre-requisite.
Entangle depends on a number of 3rd party libraries the most critical of which are of course GTK3 and libgphoto2. GTK3 is available for Minge64 in Fedora already, but libgphoto2 is not in such good shape. There is clear evidence that someone has done some amount of work porting libgphoto2 to Windows in the past, but it is unclear to me if it was ever complete, as today’s codebase certainly does not work. One evening’s hacking was enough to fix the blocking compile errors exposed when cross-compiling with Mingw64, but that left many, many 100’s of compile warnings. Even with the native Linux toolchain, libgphoto2 spews several 100 compiler warning messages, which really obscure the warnings relevant to Mingw64. So I’ve spent several more evenings cleaning up compiler warnings in libgphoto2 on Linux, resulting in a 17 patch series just submitted upstream. Now I can focus on figuring out the rest of the Mingw64 portability problems in the codebase. There’s still a way to go before Entangle will be available on Windows, but at least it looks like it will be a feasible effort overall.