The previous post described how to setup an iSCSI target on Fedora/RHEL the hard way. This post demonstrates how to configure iSCSI on a libvirt KVM host using virsh and then provison a guest using virt-install.
Defining the storage pool
libvirt manages all storage through an object known as a “storage pool”. There are many types of storage pools SCSI, NFS, ext4, plain directory and, interesting for this article, iSCSI. All libvirt objects are configured via an XML description and storage pools are no exception. For an iSCSI storage pool there are three pieces of information to provide. The “Target path” determines how libvirt will expose device paths for the pool. Paths like /dev/sda, /dev/sdb, etc are not a good choice because they are not stable across reboots, or across machines in a cluster, the names are assigned on a first come, first served basis by the kernel. It is strongly recommended that “/dev/disk/by-path” by used unless you know what you’re doing. This results in a naming scheme that will be stable across all machines. The “Host Name” is simply the fully qualified DNS name of the iSCSI server. Finally the “Source Path” is that adorable IQN seen earlier when creating the iSCSI target (“iqn.2004-04.fedora:fedora13:iscsi.kvmguests“). This isn’t the place to describe the full XML schema for storage pools, it suffices to say that an iSCSI config looks like this
<pool type='iscsi'>
    <name>kvmguests</name>
    <source>
        <host name='myiscsi.server.com'/>
        <device path='iqn.2004-04.fedora:fedora13:iscsi.kvmguests'/>
    </source>
    <target>
        <path>/dev/disk/by-path</path>
    </target>
</pool>
Save this XML snippet to a file named ‘kvmguests.xml’ and then load it into libvirt using the “pool-define” command.
# virsh pool-define kvmguests.xml
Pool kvmguests defined from kvmguests.xml
# virsh pool-list --all
Name                 State      Autostart
-----------------------------------------
default              active     yes
kvmguests           inactive   no
Starting the storage pool
This has saved the configuration, but has not actually logged into the iSCSI target, so no LUNs are yet visible on the virtualization host. Todo this requires running the “pool-start” command, at which point LUNs should be visible using the “vol-list” command:
# virsh pool-start kvmguests
Pool kvmguests2 started
# virsh vol-list kvmguests
Name                 Path
-----------------------------------------
10.0.0.1             /dev/disk/by-path/ip-192.168.122.2:3260-iscsi-iqn.2004-04.fedora:fedora13:iscsi.kvmguests-lun-1
10.0.0.2             /dev/disk/by-path/ip-192.168.122.2:3260-iscsi-iqn.2004-04.fedora:fedora13:iscsi.kvmguests-lun-2
The volume names shown there are what will be required later in order to install a guest with virt-install.
Querying LUN information
Further information about each LUN can be obtained using the “vol-info” and “vol-dumpxml” commands
# virsh vol-info /dev/disk/by-path/ip-192.168.122.2:3260-iscsi-iqn.2004-04.fedora:fedora13:iscsi.kvmguests-lun-1
Name:           10.0.0.1
Type:           block
Capacity:       10.00 GB
Allocation:     10.00 GB

# virsh vol-dumpxml /dev/disk/by-path/ip-192.168.122.2:3260-iscsi-iqn.2004-04.fedora:fedora13:iscsi.kvmguests-lun-1
<volume>
  <name>10.0.0.1</name>
  <key>/dev/disk/by-path/ip-192.168.122.2:3260-iscsi-iqn.2004-04.fedora:fedora13:iscsi.kvmguests-lun-1</key>
  <source>
  </source>
  <capacity>10737418240</capacity>
  <allocation>10737418240</allocation>
  <target>
    <path>/dev/disk/by-path/ip-192.168.122.2:3260-iscsi-iqn.2004-04.fedora:fedora13:iscsi.kvmguests-lun-1</path>
    <format type='unknown'/>
    <permissions>
      <mode>0660</mode>
      <owner>0</owner>
      <group>6</group>
      <label>system_u:object_r:fixed_disk_device_t:s0</label>
    </permissions>
  </target>
</volume>
Activating the storage at boot time
Finally, if everything is looking in order, then the pool can be set to start automatically upon host boot.
# virsh pool-autostart kvmguests
Pool kvmguests2 marked as autostarted
Provisioning a guest on iSCSI
The virt-install command is a convenient way to install new guests from the command line. It has support for configuring a guest to use volumes from a storage pool via its –disk argument. This arg takes the name of the storage pool, followed by the name of the volume within it. It is now time to install a guest with two disks, the first exclusive use for its root filesystem, the second to be shareable between several guests for data:
# virt-install --accelerate --name rhel6x86_64 --ram 800 --vnc --hvm --disk vol=kvmguests/10.0.0.1 --disk vol=kvmguests/10.0.0.2,perms=sh --pxe
Once this is up and running, take a look at the guest XML that virt-install used to associate the guest with the iSCSI LUNs:
# virsh dumpxml rhel6x86_64
<domain type='kvm' id='4'>
  <name>rhel6x86_64</name>
  <uuid>ad8961e9-156f-746f-5a4e-f220bfafd08d</uuid>
  <memory>819200</memory>
  <currentMemory>819200</currentMemory>
  <vcpu>1</vcpu>
  <os>
    <type arch='x86_64' machine='rhel6.0.0'>hvm</type>
    <boot dev='network'/>
  </os>
  <features>
    <acpi/>
    <apic/>
    <pae/>
  </features>
  <clock offset='utc'/>
  <on_poweroff>destroy</on_poweroff>
  <on_reboot>destroy</on_reboot>
  <on_crash>destroy</on_crash>
  <devices>
    <emulator>/usr/libexec/qemu-kvm</emulator>
    <disk type='block' device='disk'>
      <driver name='qemu' type='raw'/>
      <source dev='/dev/disk/by-path/ip-192.168.122.170:3260-iscsi-iqn.2004-04.fedora:fedora13:iscsi.kvmguests-lun-1'/>
      <target dev='hda' bus='ide'/>
      <alias name='ide0-0-0'/>
      <address type='drive' controller='0' bus='0' unit='0'/>
    </disk>
    <disk type='block' device='disk'>
      <driver name='qemu' type='raw'/>
      <source dev='/dev/disk/by-path/ip-192.168.122.170:3260-iscsi-iqn.2004-04.fedora:fedora13:iscsi.kvmguests-lun-2'/>
      <target dev='hdb' bus='ide'/>
      <shareable/>
      <alias name='ide0-0-1'/>
      <address type='drive' controller='0' bus='0' unit='1'/>
    </disk>
    <controller type='ide' index='0'>
      <alias name='ide0'/>
      <address type='pci' domain='0x0000' bus='0x00' slot='0x01' function='0x1'/>
    </controller>
    <interface type='network'>
      <mac address='52:54:00:0a:ca:84'/>
      <source network='default'/>
      <target dev='vnet1'/>
      <alias name='net0'/>
      <address type='pci' domain='0x0000' bus='0x00' slot='0x04' function='0x0'/>
    </interface>
    <serial type='pty'>
      <source path='/dev/pts/28'/>
      <target port='0'/>
      <alias name='serial0'/>
    </serial>
    <console type='pty' tty='/dev/pts/28'>
      <source path='/dev/pts/28'/>
      <target port='0'/>
      <alias name='serial0'/>
    </console>
    <input type='mouse' bus='ps2'/>
    <graphics type='vnc' port='5901' autoport='yes' keymap='en-us'/>
    <video>
      <model type='cirrus' vram='9216' heads='1'/>
      <alias name='video0'/>
      <address type='pci' domain='0x0000' bus='0x00' slot='0x02' function='0x0'/>
    </video>
  </devices>
</domain>
In particular, notice how the guest uses the huge paths under /dev/disk/by-path to refer to the LUNs, and also that the second disk has the <shareable/> flag set. This ensures the SELinux labelling allows multiple guests to access the disk and that all I/O caching is disabled on the host. Both critically important if you want the disk to be safely shared between guests.
Summing up
To allow migration of guests between hosts, some form of shared storage is required. People often turn to NFS at first, but this has security shortcomings because it does not allow for SELinux labelling, which means that there is limited sVirt protection between guests. ie one guest can access another guests’s disks. By choosing iSCSI as the shared storage platform, full sVirt isolation between guests is maintained on a par with non-shared storage setups. Hopefully this series of iSCSI related blog posts have shown that even provisioning KVM guests on iSCSI the hard way, is not actually very hard at all. It also shows that you don’t need a expensive commercial NAS to make use of iSCSI, any server with a bunch of disks running Fedora or RHEL can easily be turned into an iSCSI storage server for your virtual machines, though you will have to be prepared to get your hands dirty!
The previous articles showed how to provision a guest on iSCSI the nice & easy way using a QNAP NAS and virt-manager. This article and the one that follows, will show how to provision a guest on iSCSI the “hard way”, using the low level command line tools tgtadm, virsh and virt-install. The iSCSI server in this case is going to be provided by a guest running Fedora 13, x86_64.
Enabling the iSCSI target service
The first task is to install and enable the iSCSI target service. On Fedora and RHEL servers, the iSCSI target service is provided by the ‘scsi-target-utils’ RPM package, so install that now and set the service to start on boot
# yum install scsi-target-utils
# chkconfig tgtd on
# service tgtd start
Allocating storage for the LUNs
The Linux SCSI target service does not care whether the LUNs exported are backed by plain files, LVM volumes or raw block devices, though obviously there is some performance overhead from introducing the LVM and/or filesystem layers as compared to block devices. Since the guest providing the iSCSI service in this example has no spare block device or LVM space, raw files will have to be used. In this example, two LUNs will be created one thin provisioned (aka sparse file) 10 GB LUN and one fully allocated 500 MB LUN
# mkdir -p /var/lib/tgtd/kvmguests
# dd if=/dev/zero of=/var/lib/tgtd/kvmguests/rhel6x86_64.img bs=1M seek=10240 count=0
# dd if=/dev/zero of=/var/lib/tgtd/kvmguests/shareddata.img bs=1M count=512
# restorecon -R /var/lib/tgtd
Exporting an iSCSI target and LUNs (the manual way)
Historically, you had to invoke a series of tgtadm commands to setup the iSCSI target and LUNs and then add them to /etc/rc.d/rc.sysinit to make sure they run on every boot. This is true of RHEL5 vintage scsi-target-utils at least. If you have a more recent version circa Fedora 13 / RHEL-6 there is finally a nice configuration file to handle this setup, so those lucky readers can skip ahead. The first step is to add a target, for this the adorable IQNs make a re-appearance
# tgtadm --lld iscsi --op new --mode target --tid 1 --targetname iqn.2004-04.fedora:fedora13:iscsi.kvmguests
Next step is to associate the storage volumes, just created, with LUNs in the iSCSI target.
# tgtadm --lld iscsi --op new --mode logicalunit --tid 1 --lun 1 --backing-store /var/lib/tgtd/kvmguests/rhel6x86_64.img
# tgtadm --lld iscsi --op new --mode logicalunit --tid 1 --lun 2 --backing-store /var/lib/tgtd/kvmguests/shareddata.img
To confirm that all went to plan, query the iSCSI target setup
# tgtadm  --lld iscsi --op show --mode target
Target 1: iqn.2004-04.fedora:fedora13:iscsi.kvmguests
    System information:
        Driver: iscsi
        State: ready
    I_T nexus information:
    LUN information:
        LUN: 0
            Type: controller
            SCSI ID: IET     00010000
            SCSI SN: beaf10
            Size: 0 MB
            Online: Yes
            Removable media: No
            Backing store type: rdwr
            Backing store path: None
        LUN: 1
            Type: disk
            SCSI ID: IET     00010001
            SCSI SN: beaf11
            Size: 10737 MB
            Online: Yes
            Removable media: No
            Backing store type: rdwr
            Backing store path: /var/lib/tgtd/kvmguests/rhel6x86_64.img
        LUN: 2
            Type: disk
            SCSI ID: IET     00010002
            SCSI SN: beaf12
            Size: 537 MB
            Online: Yes
            Removable media: No
            Backing store type: rdwr
            Backing store path: /var/lib/tgtd/kvmguests/shareddata.img
    Account information:
    ACL information:
Finally, allow client access to the target. This example allows access to all clients without any authentication.
# tgtadm --lld iscsi --op bind --mode target --tid 1 --initiator-address ALL
Exporting an iSCSI target and LUNs (with a config file)
As mentioned earlier, modern versions of scsi-target-utils now include a configuration file for setting up targets and LUNs. The master configuration is /etc/tgt/targets.conf and is full of example configurations. To replicate the manual setup from above requires adding a configuration block that looks like this
<target iqn.2004-04.fedora:fedora13:iscsi.kvmguests>
backing-store /var/lib/tgtd/kvmguests/rhel6x86_64.img
backing-store /var/lib/tgtd/kvmguests/shareddata.img
</target>
With the configuration update, load it into the iSCSI target daemon
#tgt-admin --execute
Two common mistakes
The two most likely places to trip up when configuring the iSCSI target are SELinux and iptables. If adding plain files as LUNs in an iSCSI target, make sure the files are labelled suitably with system_u:object_r:tgtd_var_lib_t:s0. For iptables, ensure that port 3260 is open.
That is a very quick guide to setting up an iSCSI target on Fedora 13. The next step is to switch back to the virtualization host and provision a new guest using iSCSI for its virtual disk. This is covered in Part II
Part I of this posting, walked through the steps to create a iSCSI target and LUN on a QNAP server. Part II now considers provisioning guests using iSCSI storage from virt-manager.
Storage pool management
After launching virt-manager and connecting to the desired hypervisor, QEMU/KVM in my case, the first step is to open up the storage management pane. From the main virt-manager window, this can be found by selecting the menu “Edit -> Host Details” and then navigating to the “Storage” tab. The host shown here already has two storage pools configured, both pointing at local filesystem directories. The “default” storage pool will usually be visible on all libvirt hosts managed by virt-manager and lives in /var/lib/libvirt/images. This isn’t much use if you plan to migrate guests between machines, because some form of shared storage is required between the hosts. This is where iSCSI comes into the equation. To add a iSCSI storage pool, click the “+” button in the bottom-left of the window
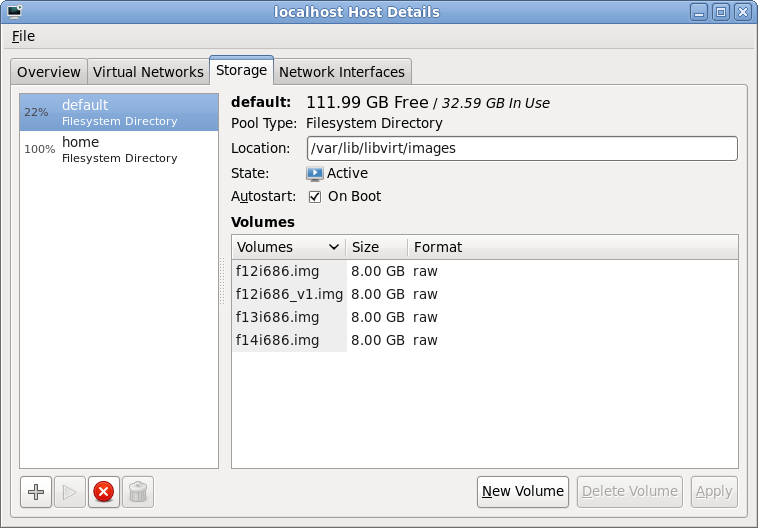
Storage pool list
Adding a storage pool
The first stage of setting up a storage pool is to provide a short name and select the type of storage to be accessed. For sake of consistency this example gives the storage pool the same name as the iSCSI target previously configured on the QNAP.
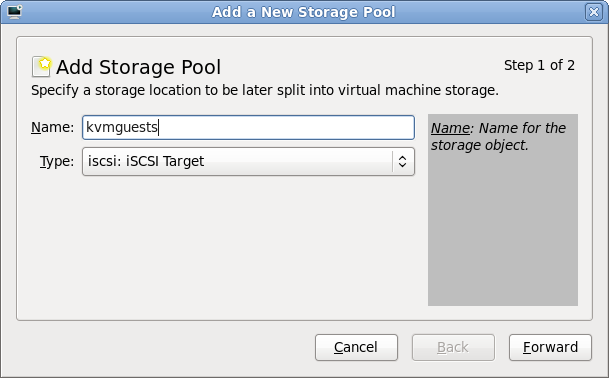
Storage pool creation
Entering iSCSI parameters
The “Target path” determines how libvirt will expose device paths for the pool. Paths like /dev/sda, /dev/sdb, etc are not a good choice because they are not stable across reboots, or across machines in a cluster, the names are assigned on a first come, first served basis by the kernel. Thus virt-manager helpfully suggests that you use paths under “/dev/disk/by-path”. This results in a naming scheme that will be stable across all machines. The “Host Name” is simply the fully qualified DNS name of the iSCSI server. Finally the “Source Path” is that adorable IQN seen earlier when creating the iSCSI target (“iqn.2004-04.com.qnap:ts-439proii:iscsi.kvmguests.bf6d84“)
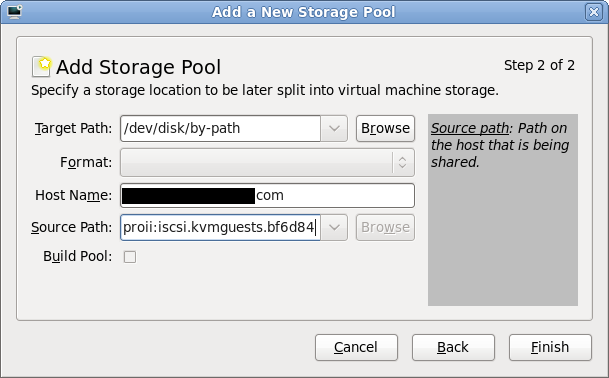
iSCSI storage pool parameters
Browsing iSCSI LUNs
If all went to plan, libvirt connected to the iSCSI server and imported the LUNs associated with the iSCSI target specified in the wizard. Selecting the new storage pool, it should be possible to see the LUNs and their sizes. These steps can be repeated on other hosts if the intention is to migrate guests between machines. Obviously care should be taken to not run the same VM on two machines at once though. Ideally use clustering software to protect against this scenario.
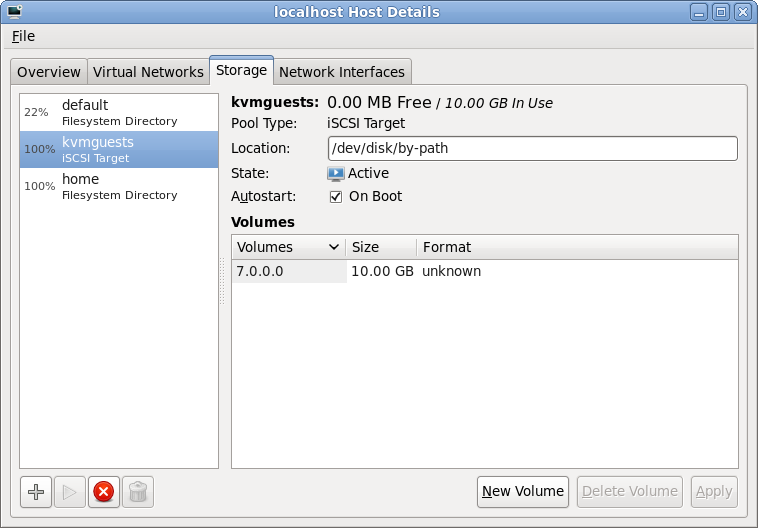
iSCSI LUN browsing
Selecting storage for a new VM
With the iSCSI storage pool configured in virt-manager, it is now possible to create a guest. After breezing through the first couple of steps in the “New VM wizard”, it is time to specify what storage to use for the new guest. By default virt-manager will allocate storage from the local filesystem. This isn’t what we want now, so go for the “Select managed or other existing storage” option and hit the “Browse” button
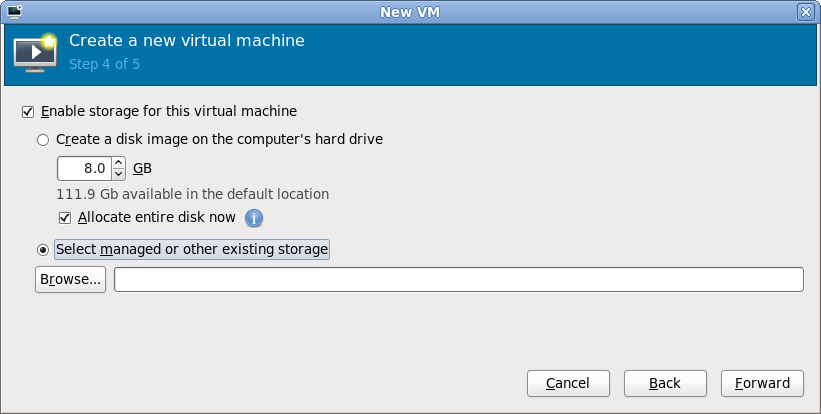
New guest storage selection
Browsing iSCSI LUNs for the new VM
The dialog that has appeared shows all the storage pools this libvirt connection knows about. This should match the pools seen a short while ago when configuring the iSCSI storage pool. It should be fairly obvious what todo at this point, select the iSCSI storage pool and the desired LUN (volume) within it and press “Choose Volume”
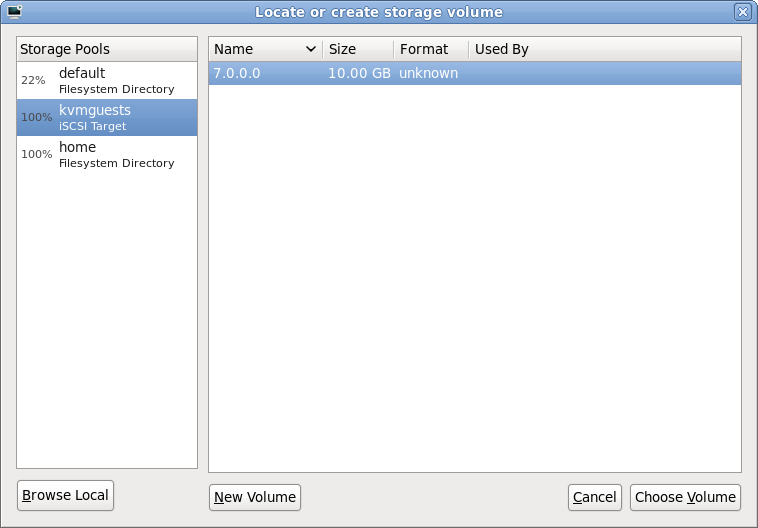
iSCSI LUN selection
Continuing the new VM wizard
After choosing an iSCSI LUN, its path should now be displayed. It’ll be a rather long and scary looking path under /dev/disk/by-path, don’t stare at it for too long. Just continue with the rest of the new VM wizard in the normal manner and the guest will shortly be up & running using iSCSI storage for its virtual disk.
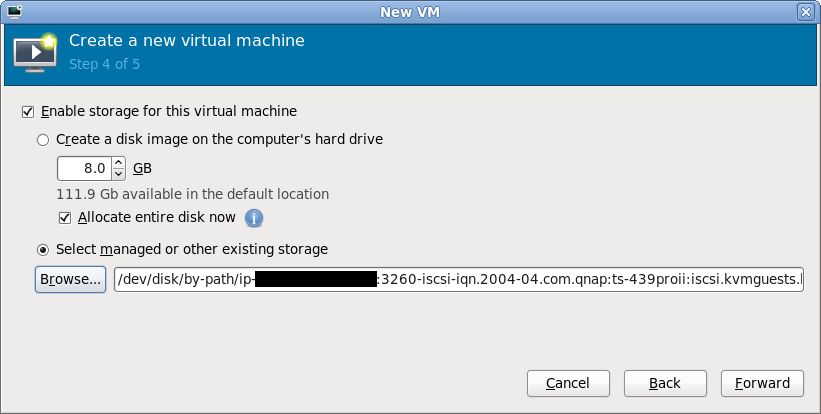
New guest storage path
Final words
Hopefully this quick walkthrough has shown that provisioning KVM guests on Fedora 12 using iSCSI is as easy as 1..2..3.. The hard bit is probably going to be on your iSCSI server if you don’t have a NAS with a nice administrative interface like the QNAP’s. The libvirt storage pool management architecture includes support for actually constructing storage pools & allocating LUNs. For a LVM storage pool libvirt would do this using vgcreate and lvcreate respectively. The iSCSI protocol standard does not support these kinds of operations but many vendors provide ways todo this with custom APIs, for example, Dell EqualLogic iSCSI arrays have a SSH command shell that can be used for LUN creation/deletion. It would be desirable to add support for these vendor specific APIs for LUN creation/deletion in libvirt. It could even be possible to support iSCSI target creation from libvirt if suitable APIs were available. This would dramatically simplify the steps required to provision new guests on iSCSI by enabling everything to be done from virt-manager, without the need to touch the NAS admin interfaces.
I recently got a rather nice QNAP NAS to replace my crufty, cobbled together home fileserver. Unpack the NAS, insert 4 SATA disks and turn it on. The first time it starts up, it prompts to set up RAID5 across the disks by default (overridable to any other RAID config or no RAID) and after a few minutes formatting the disks, it is up and running ready todo work. It exposes storage shares via all commonly used protocols such as SAMBA, NFS, FTP, SSH/SCP, WebDAV, Web UI, and most interestingly to this post, iSCSI. The QNAP marketing material is strongly pushing iSCSI as a solution for use in combination with VMWare but here in Fedora & the open source virt world it is KVM we’re interested in. libvirt has a fairly generic set of APIs for managing storage which allows impls for many different types of storage, including iSCSI. The virt-manager app provides a UI for nearly all of the libvirt storage capabilities, again including iSCSI. This blog posting will graphically illustrate how to deploy a new guest on Fedora 12 using virt-manager and the QNAP iSCSI service.
iSCSI Service Enablement
In the QNAP administration UI, navigate to the “Disk Management -> iSCSI” panel. Ensure the iSCSI Target Service is enabled and running on the default TCP port 3260. libvirt currently has no need for iSNS, so that can be left disabled unless you have other reasons for requiring its use.
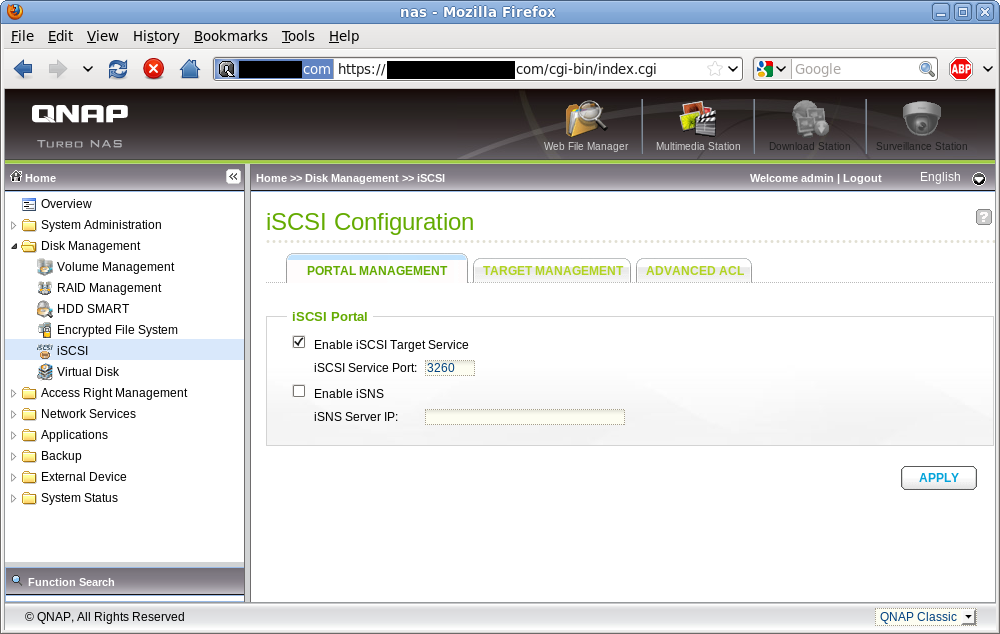
iSCSI Service Enablement
iSCSI Targets
An iSCSI target is simply a means to group a set of LUNs (storage volumes). There are many ways to organize your targets + LUNs, but to keep things simple I’m going to keep all my KVM guest storage volumes in a single target and enable this target on all my virtualization hosts. Some people like the other extreme of one target per guest, and only enabling the guest’s target on the host currently running the guest. In this screengrab I’ve already got one iSCSI target for other experimentation and intend to use the ‘Quick Configuration Wizard’ to add a new one for my KVM guests.
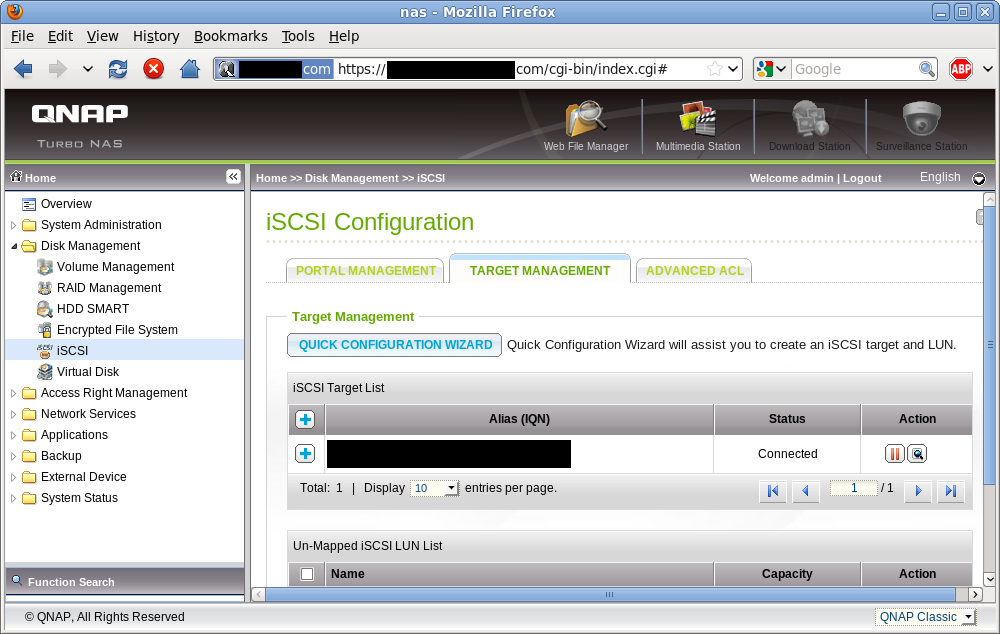
iSCSI target list
iSCSI Target + LUN creation
Since this is my first guest, I need to create both he iSCSI target and a LUN. For future guests I can create the iSCSI LUN only and associate it with the previously created target.
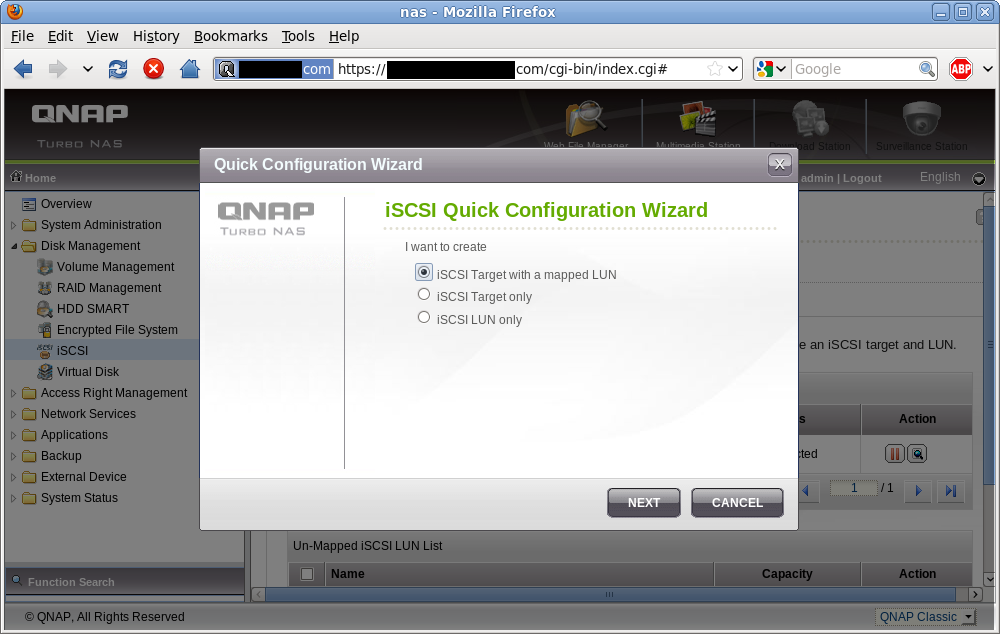
iSCSI target/LUN creation wizard
Setting the iSCSI target name
Every iSCSI target needs a unique identifier, known as the IQN. For reasons I don’t want to understand, the typical IQN format is a rather unpleasant looking string, but fortuitously the QNAP admin UI only expects you to enter a short name, which it then uses to form the full IQN. In this example I’m giving my new iSCSI target the name “kvmguests” which results in the adorable IQN “iqn.2004-04.com.qnap:ts-439proii:iscsi.kvmguests.bf6d84“. Remember this IQN, you’ll need it later in virt-manager.
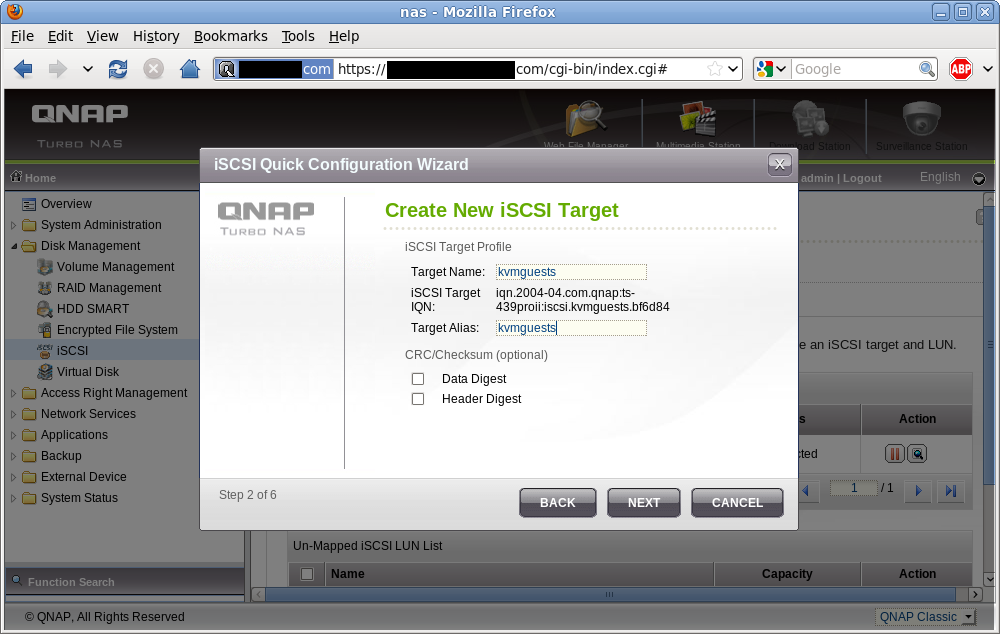
iSCSI Target naming
iSCSI target authentication
iSCSI includes support for an authentication scheme known as CHAP. Unfortunately libvirt does not yet support configuration of iSCSI storage using CHAP, so this has to be left disabled. This sucks if you’re using a shared/untrusted local network between your virt hosts & iSCSI server, but if you’ve got a separate network or VLAN dedicated to storage traffic this isn’t so much of a problem. I also don’t care for home usage.
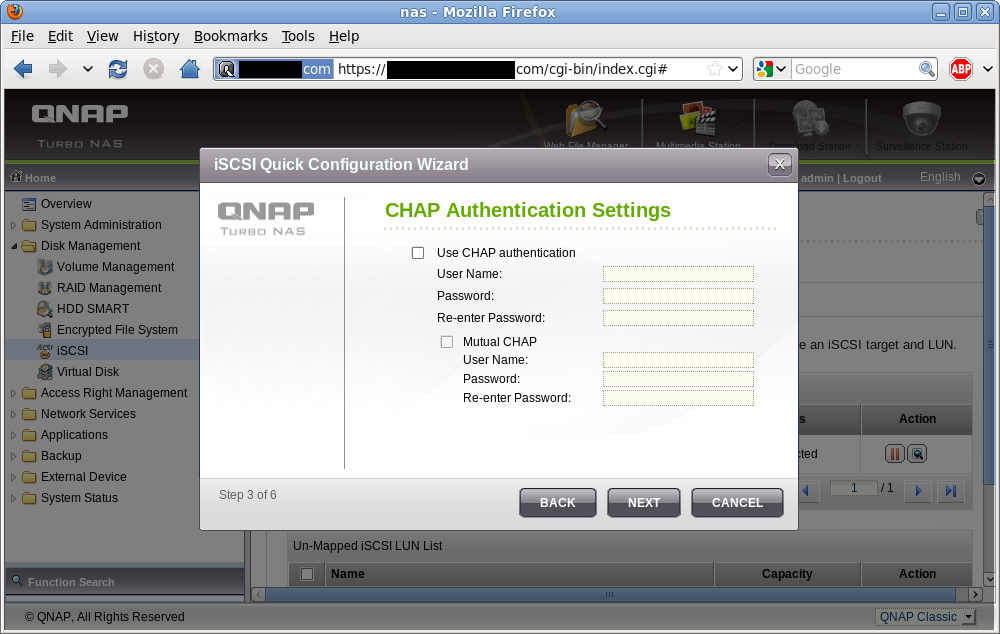
iSCSI target authentication
iSCSI LUN allocation
Now the iSCSI target is configured, it is time to allocate storage for the LUN. This is what will provide the guest’s virtual disk. Each LUN configured via the QNAP admin UI ends up being backed by a plain file on the NAS’ (ext4) filesystem. If you choose the “Thin Provisioning” option at this stage, the LUN’s backing file will be a sparse file with no storage allocated upfront. It will grow on demand as data is written to it. This allows you to over-commit allocation of storage on the NAS, with the expectation that should you actually reach the limit on the NAS some time later, you can simply swap in larger disks to the RAID array or attach some extra external SATA devices. “Instant allocation” meanwhile, fully allocates the LUN at time of creation so there is never a problem of running out of disk space at runtime. The LUN name is just an aid-memoir for the admin. I name my LUNs to match the KVM guest name, so this one is called “rhel6x86_64”. The size of 10 GB will be more than enough for the basic RHEL6 install I plan.
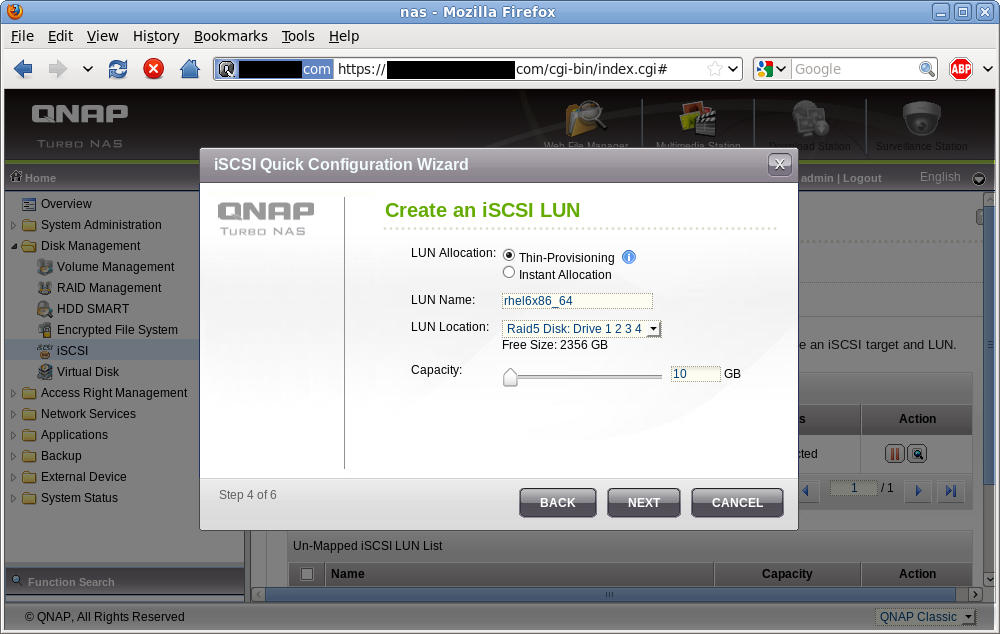
iSCSI LUN allocation
iSCSI setup confirmation
Before actually creating the iSCSI target and LUN, the QNAP wizard allows a chance to review the configuration choices just made.
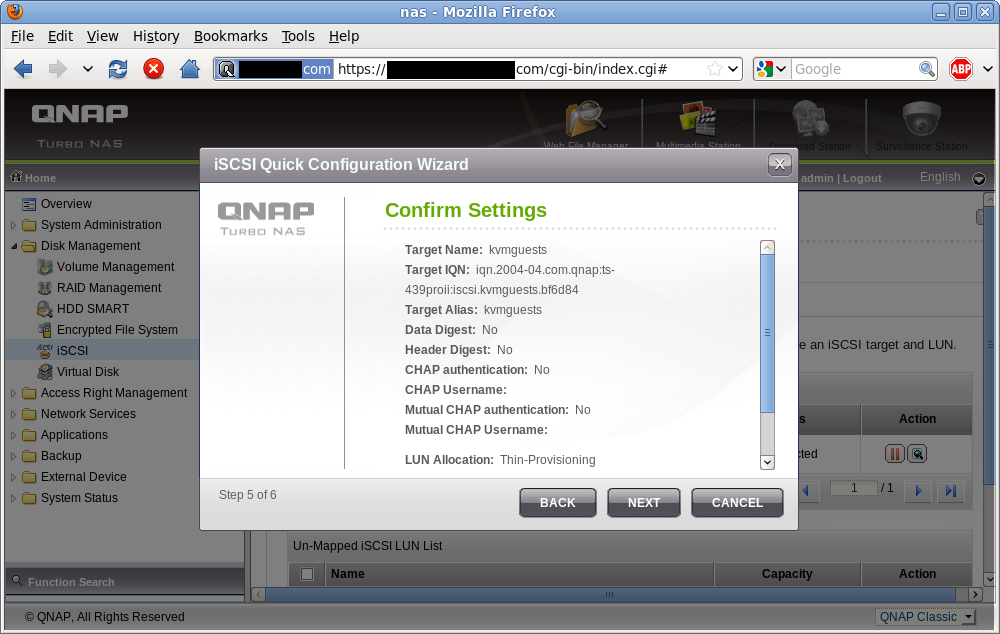
iSCSI target + LUN creation summary
iSCSI target list (updated)
After completing the wizard, the browser returns to the list of iSCSI targets. The newly created target is visible, with one LUN beneath it. The status of ‘Processing’ just means that storage for the LUN is still being allocated & goes away pretty much immediately for LUNs using ‘Thin provisioning’ since there’s no data to allocate upfront. In theory full allocation should be pretty much instantaneous on ext4 too, if QNAP is using posix_fallocate, but I’ve not had time to check that yet.
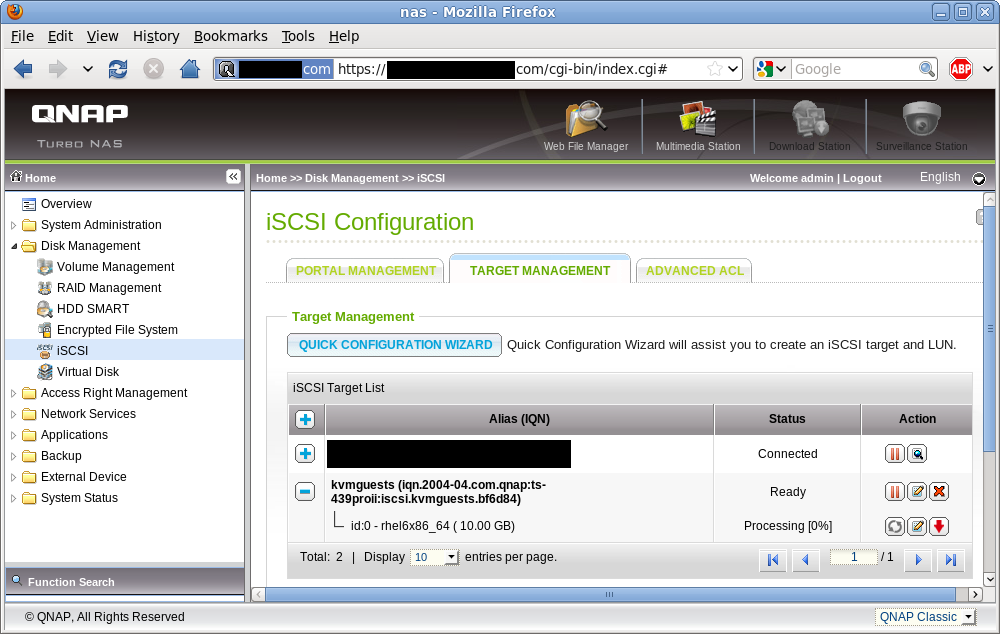
iSCSI target list (updated)
With the iSCSI target and LUN created, it is now time to provision a new KVM guest using this storage. This is the topic of Part II
In the middle of the night on Wednesday I finally bundled up a first release of the application now called Entangle (formerly referred to as Capa). Entangle provides a GTK desktop application for tethered camera control & capture, using the gphoto library. This first v0.1.0 release includes
- Control over nearly all camera settings exposed by libgphoto, from simple things like shutter speed, aperture, ISO, to advanced things like Nikon CLS flash group power, autofocus points and more.
- Remote trigger of the camera shutter from the connected computer and download of the captured image
- Preview of the scene to be captured using “live view” capability in recent dSLRs, though the UI needs work
- Monitoring of the camera & automatic download of new images as they are captured
- Fullscreen and presentation modes, xrandr aware, to allow display on arbitrary monitors
- ICC profiles for accurate display of image colours. Use GNOME Colour Manager to setup your monitor profile
That may sound like a nice list of features, but there is still plenty of work to be done, not least improving the UI for controlling camera settings which is not at all scalable when there are hundreds of settings available. There is a crude plugin system taking advantage of GObject introspection to allow extensions to be written using JavaScript, but at Bastien’s suggestion I’ll likely re-write that to use libgpe. The engine of the app can also easily be used to create a GIMP plugin for image acquisition
The Fedora review is approved and so as soon as CVS is ready I’ll be building for F13 & rawhide, since the design team apparently want it to be part of the Design Studio Spin which surprised me somewhat !


